How to Use These
Upload your photo to an AI image generator and paste the prompt. Each one does something different to your image. Some enhance what’s already there.
Others rebuild the entire photo in a new style. All of them keep your face and composition intact. I created all these with Nano Banana 2, but you can also use other image generators of similar quality.
Read more: Free websites to watch movies, TV shows, anime and play games
I recommend accessing them through AI platforms with all the best image & video models like AIVideo, Freepik, Luma AI, and others. It’s the easiest way to not just access all the best models but also create multiple images from 1 prompt.
If you want to get cheaper subscriptions than everybody else, we have a subpage with discounts for many different softwares you can check here.
Below are all 10 prompts, ready to copy and use.
1. 4K Enhancement
This enhancement prompt upscales your photo to ultra-high resolution while keeping everything exactly as it is. No style changes, no reshaping. It just makes the image sharper and more detailed. Pores, hair strands, fabric texture, everything gets clearer. Good for cleaning up phone photos or low-res images.
Prompt: Ultra-high-resolution 4K enhancement based strictly on the provided reference image. Absolute fidelity to original facial anatomy, proportions, and identity. Preserve expression, gaze, pose, camera angle, framing, and perspective with zero deviation. Clothing, hair, skin, and background elements must remain unchanged in structure, placement, and design.
Recover fine-grain detail with natural realism. Enhance pores, fine lines, hair strands, eyelashes, fabric weave, seams, and material edges without introducing stylization. Maintain original color science, white balance, and tonal relationships exactly as captured. Lighting direction, intensity, contrast, and shadow behavior must match the source image precisely, with only improved clarity and expanded dynamic range. No relighting, no reshaping. Remove any grain.
Apply controlled sharpening and high-frequency detail reconstruction. Remove compression artifacts and noise while retaining authentic texture. No smoothing, no plastic skin, no artificial gloss. Facial features must remain consistent across the entire image with coherent anatomy and clean, stable edges.
Negative constraints: no warping, no facial drift, no added or missing anatomy, no altered hands, no distortions, no perspective shift, no text or graphics, no hallucinated detail, no stylized rendering. Output must read as a true-to-life, photorealistic upscale that matches the reference exactly, only clearer, sharper, and higher resolution.
2. Behind-the-Scenes Movie Shot
This one makes your photo look like a raw on-set snapshot from a film production. Crew members, boom mics, cables on the floor, light stands in the background. The person in the photo looks like an actor in full wardrobe between takes. Replace “[movie name]” with any film you want.
Prompt: Raw on-set snapshot, crew filming a scene from [movie name], director mid-discussion with camera operator, actors off to the side in full wardrobe and makeup looking exactly as they do in the final film, accurate hair, costume, and character styling unchanged, the moment staged is a clearly recognizable scene from the film with matching set design, props, and blocking, boom mic dipping slightly into frame, cables tangled across the floor, light stands and reflectors crowding the space, Sony a7S III with 50mm f1.8 handheld, slightly off-level framing, harsh mixed lighting from practicals and film rigs, blown highlights and shadow falloff, visible skin texture with sweat and worn makeup, stray hairs and wrinkled fabric, background crew in subtle motion blur, noticeable ISO grain and color shift from mixed light, unpolished and intrusive feel.
3. Professional Studio Headshot
Turns any casual photo into a clean, polished studio headshot. The kind used for casting agencies, LinkedIn, or magazine profiles. It keeps your exact clothes and hair but rebuilds the lighting and background to look like a proper studio session.
Prompt: Image edit directive, convert the subject from the input photo into a clean professional studio headshot while preserving the exact clothing, hairstyle, and accessories from the original image.
Studio portrait look. Tight head and shoulders framing, centered composition, neutral confident expression, eyes directly toward camera. Professional talent headshot aesthetic used by casting agencies and magazine profiles.
Background minimal seamless light gray studio backdrop with soft falloff. No visible texture or environment.
Lighting setup high end studio beauty lighting. Large soft key light slightly above eye level, centered but angled down. Soft fill from front to remove harsh shadows. Subtle rim light behind shoulders for separation. Even illumination across face with gentle shadow under jawline. Catchlights visible in both eyes.
Camera perspective eye level. Shot on Canon 85mm f1.8 portrait lens. Crisp focus on eyes, shallow depth of field so ears and shoulders fall slightly softer.
Skin rendering realistic and professional. Natural pores visible, subtle skin texture, no plastic smoothing. Balanced color grading, neutral skin tones, clean contrast.
Hair carefully groomed but natural. Individual strands visible. Clothing preserved exactly as in the source image with accurate fabric texture, folds, and color.
Retouch level magazine professional but realistic. Remove temporary blemishes only. Keep natural facial structure, freckles, pores, and fine lines.
Final look polished agency headshot. Neutral background, balanced lighting, symmetrical framing, professional studio finish.
4. GTA V Screenshot
Rebuilds your entire photo as a GTA V in-game screenshot. Not a filter. The AI reconstructs everything as 3D game assets with polygon structure, baked textures, and GTA V color grading. People in the photo become game characters with slightly exaggerated proportions and matte skin. The environment gets rebuilt as Los Santos or Blaine County.
Prompt: Rebuild the entire scene from the reference image as a real-time 3D render inside the GTA V RAGE engine. Do not apply a filter. Fully reconstruct all people, vehicles, architecture, terrain, and props as polygonal 3D assets native to GTA V. The result should look like an authentic in-game screenshot captured on a high-end PC, ultra settings enabled.
All subjects must be converted into clearly modeled geometry with visible polygon structure, baked normal maps, and game-ready textures. Faces, bodies, and clothing should follow GTA V character proportions and anatomy, slightly exaggerated, rigid, and digitally sculpted. Skin is matte and textured, no photographic pores. Hair is clumped, card-based, slightly stiff. Clothing uses flat fabric shaders with visible seams and texture repetition.
Environment must feel like Los Santos or Blaine County logic. Buildings are modular, edges slightly sharp, surfaces tiled and optimized. Roads, sidewalks, vegetation, street props, and background elements are simplified but dense, clearly game-constructed. No real-world photographic depth or lens artifacts.
Lighting follows GTA V real-time lighting behavior. Strong directional sunlight or overcast skylight depending on scene. Hard shadows with defined edges, subtle ambient occlusion in corners. Reflections are screen-space and imperfect. Colors are slightly saturated with the recognizable GTA V color grading. Contrast is controlled but punchy.
Materials must read as video game assets. Asphalt is flat and grainy. Metal has simple specular highlights. Glass is clean with limited reflection depth. Vegetation is slightly stiff and stylized. Nothing should appear physically accurate or cinematic-render realistic.
Camera should feel like a gameplay or Rockstar Editor capture. Third-person or free camera perspective. Slight wide-angle distortion. Stable framing. No depth-of-field blur. No motion blur unless minimal and engine-based.
Overall look is unmistakably GTA V. Real-time 3D. Polygonal. Textured. Optimized. Stylized realism. Clearly not a photograph.
Here’s a Minecraft prompt as well if you want it.
5. Skin Enhancement Retouch
A subtle retouching prompt that cleans up skin without making it look fake. It reduces redness and temporary blemishes while keeping pores, freckles, and natural texture intact. No plastic look, no reshaping, no airbrushed finish. The edit should be invisible.
Prompt: Skin enhancement retouch, preserve original identity and structure, refine skin texture without smoothing, maintain pores, freckles, and natural variation, reduce temporary blemishes and redness only, even out tone subtly without flattening depth, retain natural highlights and shadow transitions, keep under-eye detail intact with slight softening not removal, avoid plastic or airbrushed finish, maintain original lighting and color balance, enhance micro-contrast for realistic texture, lips and eyes untouched except for natural clarity, no reshaping of facial features, no artificial glow, no over-sharpening, seamless integration with original image, invisible edit with high realism.
6. Light and Blur Fix
Fixes dark, blurry, or low-quality night photos. It restores sharpness, removes motion blur, and replaces harsh night lighting with soft cinematic daylight. Your face, pose, and framing stay identical. Only the lighting and clarity change.
Prompt: Use the first image as the base image. Preserve the exact pose, camera distance, framing, facial structure, expression, and hair placement with zero alterations. Do not modify the subject’s face shape, features, hairline, or hairstyle in any way.
Transform the image from low-quality night capture into a high-quality cinematic portrait by restoring sharpness and clarity. Reduce motion blur and softness while keeping natural skin texture, pores, and fine details intact. No artificial smoothing, reshaping, or reconstruction.
Apply ethereal daylight-style lighting inspired by the reference effect image. Introduce soft, diffused sun rays entering from an upper side angle, striking the cheekbones, nose bridge, lips, and individual hair strands. Highlights should glow gently while shadows remain deep and clean, creating strong cinematic contrast.
Add subtle lens bloom, controlled light haze, and a thin atmospheric glow that wraps around the face and shoulders without washing out details. Enhance backlit stray hairs so they catch the sunlight naturally.
Render skin with luminous translucency and warm peach undertones while fully preserving original complexion and texture. No changes to identity.
Color-grade with slightly lowered saturation, warm highlights, and cooler shadows. Introduce delicate film-style grain for a refined, cinematic finish.
Keep the background exactly the same, allowing only natural sunlight flares and soft bokeh to interact with the subject. No background replacement or distortion.
Final result should feel like a soft, sunlit daydream, cinematic and ethereal, while remaining a perfect visual match to the original image in pose, scale, and identity.
7. Oil Painting Effect
Converts your photo into a traditional fine-art oil painting. Visible brushstrokes, layered pigments, canvas grain, and painterly blending. Everything stays in the same position and composition. It looks like a master painter recreated your photo on canvas.
Prompt: Transform the reference image into a traditional fine-art oil painting while preserving the exact composition, proportions, perspective, camera angle, lighting, and colors.
Apply realistic oil-paint textures with visible brushstrokes, layered pigments, subtle canvas grain, and smooth painterly blending. Slightly soften edges naturally, without changing any forms.
Do not add, remove, exaggerate, stylize, or alter anything. No abstraction or redesign.
The result should look like the same image carefully repainted by a master oil painter.
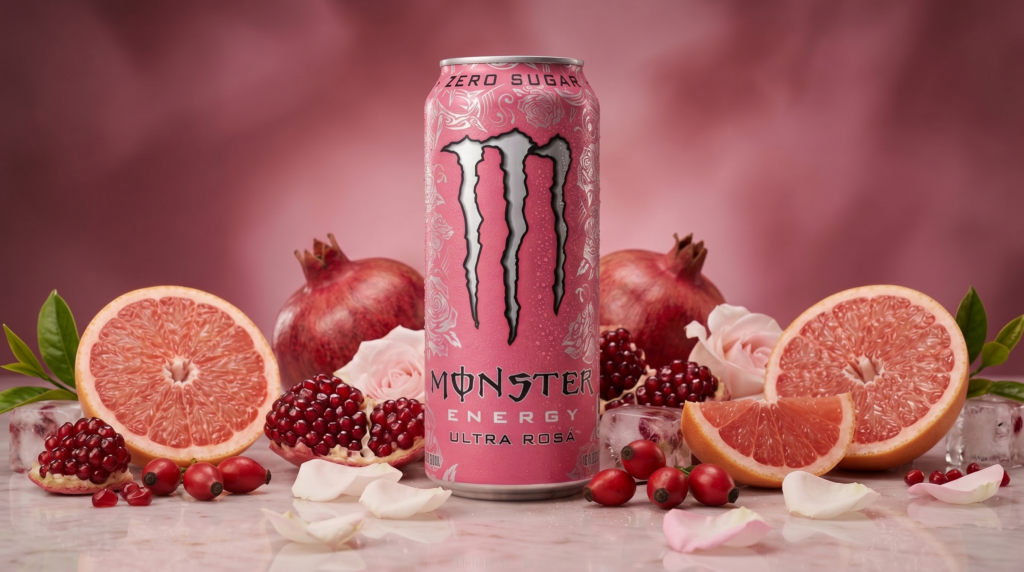
8. Product Ad
Takes a product from your photo and rebuilds it as a premium ad composition. The product gets isolated, centered, and surrounded by its key ingredients. Think of those clean product shots you see from skincare or food brands. Works well for drinks, cosmetics, food products, or anything with visible ingredients.
Prompt: Product studio transformation, isolate the product from the reference image and rebuild as a premium ad composition, hero product centered and sharply in focus, surrounded by its key ingredients arranged with intention and depth, ingredients fresh and tactile, sliced, crushed, or whole depending on context, composition balanced but not perfectly symmetrical, clean surface with subtle reflections, background designed to match the product’s color palette and mood, soft gradients or tonal transitions, high-end studio lighting with controlled highlights and gentle shadow falloff, crisp edges with slight natural shadow grounding the product, micro-details visible like condensation, texture on ingredients, and fine surface imperfections, minimal but intentional negative space, no clutter beyond ingredients, polished commercial finish without looking artificial, accurate color rendering and realistic material response.
9. Famous Person Selfie
Generates a casual iPhone selfie of you standing next to a famous person. Replace “[famous person]” with whoever you want. The AI creates a candid, slightly imperfect photo that looks like it was actually taken on a phone. Uneven lighting, slight lens distortion, minor motion blur. It doesn’t look staged.
Prompt: Raw iPhone selfie, subject from reference image and [famous person] standing close together, [famous person] appearing as most recent self with accurate hair and facial features, both leaning slightly into frame, casual shoulder-to-shoulder composition, direct gaze into camera with relaxed neutral expressions, handheld at arm’s length with slight upward tilt, soft indoor lighting mixed with phone flash causing mild overexposure on highlights and shadow falloff, natural skin texture visible with pores and subtle makeup detail, stray hairs and fabric creases present, background loosely visible with everyday environment elements slightly out of focus, minor motion blur in edges, slight lens distortion from close proximity, off-center framing with imperfect crop, subtle ISO grain and uneven white balance, unpolished, candid realism.
10. Anime Transformation
Converts your photo into detailed hand-drawn anime style. Your face structure, expression, pose, and composition stay the same. The AI translates everything into anime aesthetics: clean linework, large expressive eyes, defined hair strands, and cel shading. The background gets converted into an anime environment too.
Prompt: Anime style transformation, convert the reference image into detailed hand-drawn anime while preserving exact composition, same camera angle, framing, pose, and character proportions unchanged, maintain identical facial structure and expression translated into anime aesthetics, clean linework with controlled variation in line weight, large expressive eyes styled naturally to match original gaze direction, simplified but accurate nose and mouth, hair reinterpreted into defined anime strands while keeping original shape and flow, skin rendered with smooth tonal shading and soft gradients, lighting direction and intensity preserved from original image, colors slightly stylized but faithful to source palette, background converted into anime environment matching original depth and perspective, subtle cel shading with gentle highlights, no distortion of anatomy or perspective, no change in crop or zoom, high fidelity adaptation rather than reinterpretation.
How to Get the Best Results
These prompts are detailed for a reason. The more specific the instructions, the less the AI improvises. Each prompt tells the AI what to change and what to leave alone.
If a result doesn’t look right on the first try, regenerate. Don’t change the prompt unless something specific is consistently wrong.
Also read: Elon Musk’s Team Tried to Stop These 8 Websites From Being Discovered by Public
You can combine some of these. Run the 4K enhancement first to clean up a blurry photo, then apply the oil painting or anime prompt to the enhanced version. Layering effects this way gives you cleaner results than starting from a low-quality source.
If you want to explore more AI tools, check our homepage. Or visit the Blog for more prompts and tutorials like this one.


