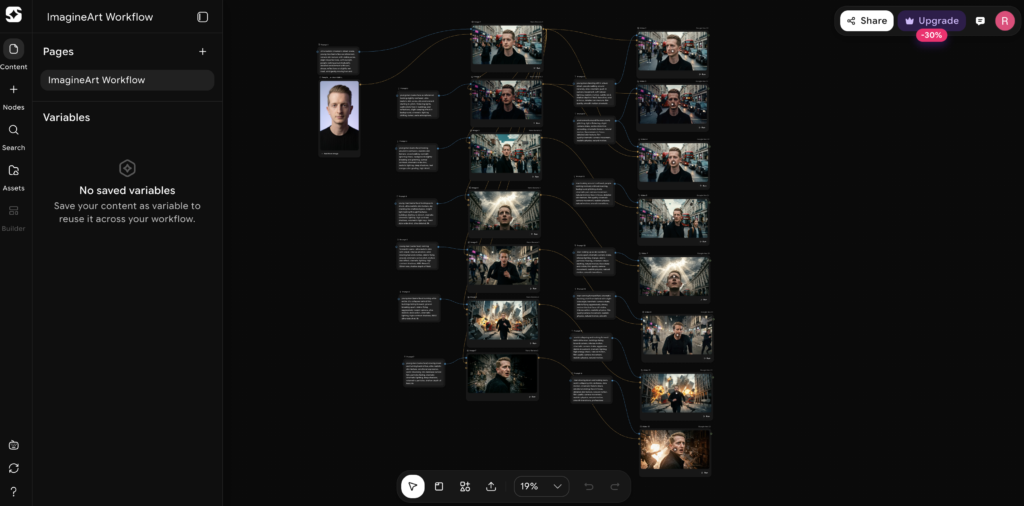
What Is ImagineArt Workflows?
ImagineArt has a feature called Workflows that lets you chain AI image generation and video generation together in one workspace. Instead of using separate tools for each step, you connect everything visually: your reference image, your prompts, and your AI models. One flows into the next.
Also read: AI Trendz Affiliate Marketing Guide To Earn $5,000+ A Month
This means you can go from a photo to a finished AI video without leaving the platform. You upload an image, generate a new version of it with AI, and then turn that generated image into a video. All in one place.
You can try my workflow here: ImagineArt Workflow
Part 1: Generate the Image
This is where you create the base image that your video will be built from. The better this image looks, the better your final video will turn out.
Step 1: Upload your image. This is your reference photo. It gives the AI a starting point for the look, pose, and composition.
Step 2: Select the prompt option and write your image prompt. Describe what you want the generated image to look like. Include details about the setting, outfit, lighting, and camera style. The more specific you are, the closer the result will match what you have in mind.
Step 3: Select image generation and choose the Nano Banana 2 model. This model handles photorealistic outputs well, which is important if you want the video to look believable.
Step 4: Connect your uploaded image and your prompt to the image generation node, then generate. The workflow interface lets you visually link these inputs to the model. Once connected, hit generate and review the result.
If the image doesn’t look right on the first try, adjust your prompt and regenerate. Small changes in wording can make a noticeable difference in the output.
Part 2: Generate the Video
Once you have a solid generated image, the next step is turning it into a video.
Step 1: Select the prompt option and paste your video prompt. This describes the motion, action, and camera behavior you want in the video. Keep it specific. Tell the AI what moves, what stays still, and what the camera does.
Step 2: Go to video generation and choose Google Veo 3. Veo 3 produces realistic motion and handles complex scenes well, which makes it a good match for the photorealistic images from Nano Banana 2.
Step 3: Connect the generated image and your video prompt to the video generation node, then generate. The AI uses your image as the first frame and your prompt as the instructions for what happens next.
Step 4: Then just download all footages, put them together and add some sound effects or video effects to make it even more engaging.
Why Workflows Work Better Than Doing It Manually
The usual way to do this involves multiple tools. You generate an image in one app, download it, upload it to a video generator, write a new prompt, and hope everything stays consistent. That process is slow and the results often don’t match because each tool interprets things differently.
With ImagineArt Workflows, everything stays connected. The image you generate feeds directly into the video generator. There’s no downloading and re-uploading. The models work from the same source, so the output stays consistent from image to video.
Quick Recap
For images:
- Upload your reference photo
- Write your image prompt
- Select Nano Banana 2 as the model
- Connect inputs and generate
For video:
- Write your video prompt
- Select Google Veo 3 as the model
- Connect the generated image and video prompt
- Generate the video
That’s the full process. Two stages, one platform, no jumping between tools.
Read more: How I Used AI to Design Futuristic LED Glasses (Accio Tutorial)
If you want to explore more AI tools, check our homepage. Or visit the Blog for more tutorials and guides like this one.


