You have probably saved posts in these styles without knowing what to call them: smeared glitch blocks, machine-vision overlays, streaks of sorted pixels, thermal heat maps, flash-burned silhouettes, glowing cyan lines, pure black and white dots, hot pink phosphor, halftone prints, and night vision. Each one below comes with a prompt that turns any photo into that look.
How to Use These
- Open Nano Banana or any other AI image generator.
- Upload your photo. Every style works from any photo.
- Paste the prompt for the style you want and generate.
- If the result comes out wrong, stay in the same chat and paste the fix prompt under it. Each style has its own.
The prompts are long on purpose. Each one explains what the style is, what it is not, and gives exact numbers such as pixel sizes and percentages. That detail stops the AI from falling back to a generic filter. Every prompt also tells the AI to keep your original composition, framing, and crop.
1. Datamosh

This style imitates the moment a video codec loses its keyframe and keeps only the motion data. The subject smears out of itself in hard, square blocks, while the rest of the picture stays perfectly clean.
What usually goes wrong: Models tend to spread a decorative glitch evenly over the whole frame and to soften the trails into motion blur. This prompt forces hard-edged block trails and keeps at least 40 percent of the picture completely clean.
Prompt: Rebuild the uploaded image as a single datamoshed video frame: the frame right after the codec lost its keyframe and kept only the motion vectors.
THE CORE CONCEPT, read this first: This is COMPRESSION DAMAGE, not blur and not a glitch filter. The picture breaks into square macroblocks, and pixels from the subject are copied, dragged and repeated along the direction of motion, so fragments of the subject leak out past its own outline into the space around it. Every trail is a straight line of duplicated blocks with hard stepped edges. It is not motion blur, not a soft smear, not a painterly streak, not an RGB split and not an evenly applied overlay: it is real content from the image, cloned block by block and displaced.
THE STRUCTURE: The damage is concentrated in one connected region centered on the main subject and spreads out from it in one dominant direction, in most cases horizontally (to the left, to the right, or both). Blocks are square, 8 to 16 pixels each at native resolution, and their boundaries stay visible as a stepped grid wherever damage meets clean image. Trails are between 30 and 300 pixels long, run perfectly straight, end abruptly on a block edge and never fade out. Some blocks freeze and float as isolated square tiles in the clean area, up to 20 percent of the frame width away from the subject. Other blocks sit in the wrong place inside the subject: a piece of its edge repeated where its middle should be, a patch of background caught inside its outline.
THE CLEAN PART: At least 40 percent of the frame, ideally more, stays completely intact: sharp, correctly colored, correctly exposed, with zero overlay, zero grain, zero tint and zero glitch. The sky, the ground, the wall, the water, whatever surrounds the subject, must look like the untouched original so the damage has something clean to contrast against.
THE COLOR: The trails carry the subject’s own colors: a red garment drags red, a white animal drags white, foliage drags green, fire drags orange. Inside the most damaged blocks the color may decouple from the brightness and produce flat patches of pale green, magenta or cyan that were not in the original, but this covers at most 10 percent of the damaged area. No global color cast and no tint over the frame.
WHAT SURVIVES: Keep the original composition, framing, crop, subject, pose and camera angle exactly. Roughly half of the subject is still readable as itself, so the eye can tell at once what the picture shows. The result is the same picture, damaged, never an abstract texture.
NEGATIVE CONSTRAINTS: No Gaussian blur, no motion blur, no soft edges anywhere in the trails. No glitch applied evenly over the whole frame. No RGB channel splitting into three offset copies. No scanlines, no VHS tracking bands, no CRT curvature, no analog noise, no film grain, no vignette. No diagonal or curved trails: they run in straight lines. No new objects, no collage, no stickers, no torn paper. No text, no timecode, no interface elements, no logos, no watermark. Do not change the crop, do not zoom in, do not add a border.
The final result must look like a real video frame captured at the exact moment the codec broke, with the subject smearing out of itself into an otherwise perfect picture.
If it comes out wrong, run this on the result: Only fix the structure: make every trail a straight run of duplicated square blocks with hard stepped edges, remove all blur and softness, and leave the clean part of the picture completely untouched. Keep the composition, colors and crop identical.
2. Blob Tracking
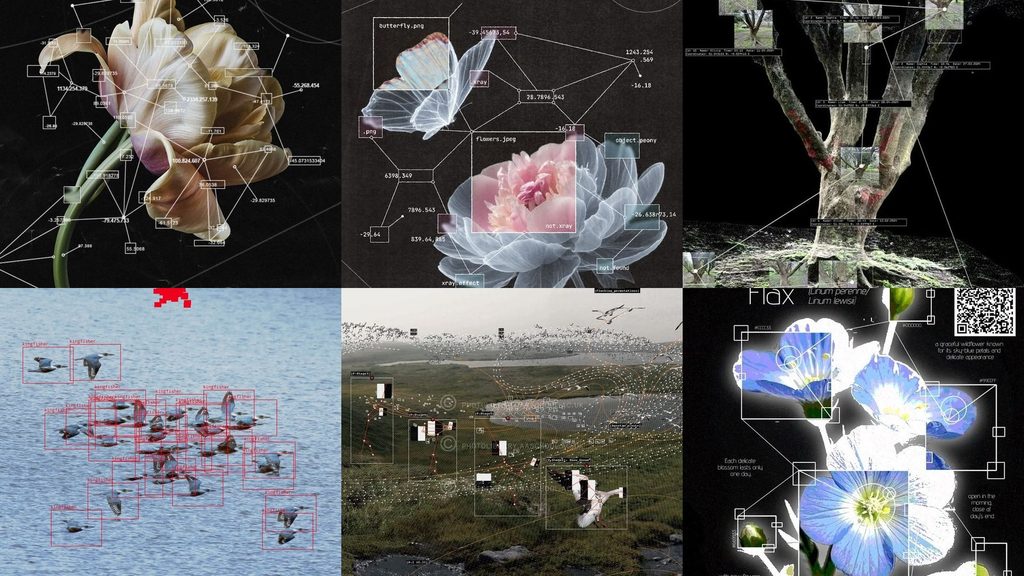
Your photo as a machine sees it. Hairline boxes, node networks, and tiny numeric labels are drawn over a darkened version of the picture, as if a tracking system were halfway through analyzing it.
What usually goes wrong: Models want to write readable explanations and draw a neat, glowing sci-fi interface. Here the labels must be unreadable data, the lines must be 1 pixel wide, white and without glow, and the background is pushed toward black.
Prompt: Rebuild the uploaded image as a frame captured from a computer vision system that is analyzing it: a tracker drawing its detections, its measurements and its guesses directly over the picture.
THE CORE CONCEPT, read this first: A machine is looking at this picture and annotating what it thinks it has found: thin boxes, node points, connecting lines and tiny numeric labels. The subject stays photographic underneath and the annotation is drawn on top as flat, hairline vector graphics with no depth. The detections must be IMPERFECT: a real tracker boxes things that do not matter, misses obvious things, boxes the same object two or three times with slightly offset rectangles, and connects points that have no logical relation. This is not an infographic, not a poster with a tidy diagram, not a film HUD, not a game interface, and nothing on it is designed to be read by a human.
THE UNDERLAY: The underlay is the original picture, with the main subject kept bright, sharp and recognizable, while the surroundings are pushed down toward near-black (about 70 to 85 percent darker than the original) and drained of most of their color, so the graphics are the brightest thing in the frame. Where the subject has fine structure (edges, veins, feathers, hair, branches, folds), part of it may be retraced as thin white contour lines or as a sparse cloud of white points, like a scan.
THE GRAPHICS, all of them hairline, white and 1 pixel wide: Draw between 15 and 40 rectangular detection boxes of very different sizes, from 10 pixels wide to a third of the frame: some tight on real features, some far too large, some overlapping, some sitting on empty background. Corners are square, and some boxes are drawn as open corner brackets only.
Draw between 20 and 60 small node points, 2 to 3 pixels each, joined by straight lines into an irregular network that spans the whole frame, including the empty areas. Lines cross each other freely.
Add three to eight tiny square crops of parts of the picture, 40 to 90 pixels wide, pasted elsewhere in the frame with a thin white border and a leader line back to the place they were cut from.
Add one or two faint large circles or arcs crossing the frame, and a few long alignment lines that run all the way to the frame edge.
THE LABELS: The labels are tiny monospace text, 5 to 8 pixels tall, and deliberately hard to read. Labels are DATA only: decimal numbers with 3 to 6 digits, negative values, coordinate pairs, short filenames with extensions such as .png or .jpeg, tokens like id, obj or frame, and hex codes. There are twenty to fifty labels scattered next to nodes and boxes, a few of them clipped by the frame edge. Nothing is written in plain language, and no word describes the subject.
THE PALETTE: The palette is a near-black ground with white graphics and white labels, plus exactly one accent color, a small red or orange, used on no more than three elements (a filled box, a highlighted node, a single line). No other color appears in the graphics.
WHAT SURVIVES: Keep the original composition, framing, crop, subject and pose exactly. The subject remains fully recognizable as a photograph under the annotation, and the boxes and nodes follow the real shapes in the picture even when they pick the wrong ones.
NEGATIVE CONSTRAINTS: No thick lines, no rounded corners, no glow, no drop shadows, no gradients on the graphics. No legible sentences, headings, titles, captions, brand names or explanations. No neon cyan sci-fi interface, no radar, no circular gauges, no percentage bars, no screen bezel. No 3D and no perspective on the graphics: everything sits flat on the picture plane. No bright saturated background: it must be darkened. No second accent color. No readable text, no logos, no watermark. Do not change the crop.
The final result must look like a raw screenshot exported from a machine vision tool halfway through a job, not like a designed poster about one.
If it comes out wrong, run this on the result: Only fix the annotation: make the detection boxes inconsistent (some far too large, some overlapping, some on empty background, a few obvious things left undetected), reduce every line to a white line 1 pixel wide with no glow, and replace any readable word with numbers or filenames. Keep the photograph, the composition and the crop identical.
3. Pixel Sort
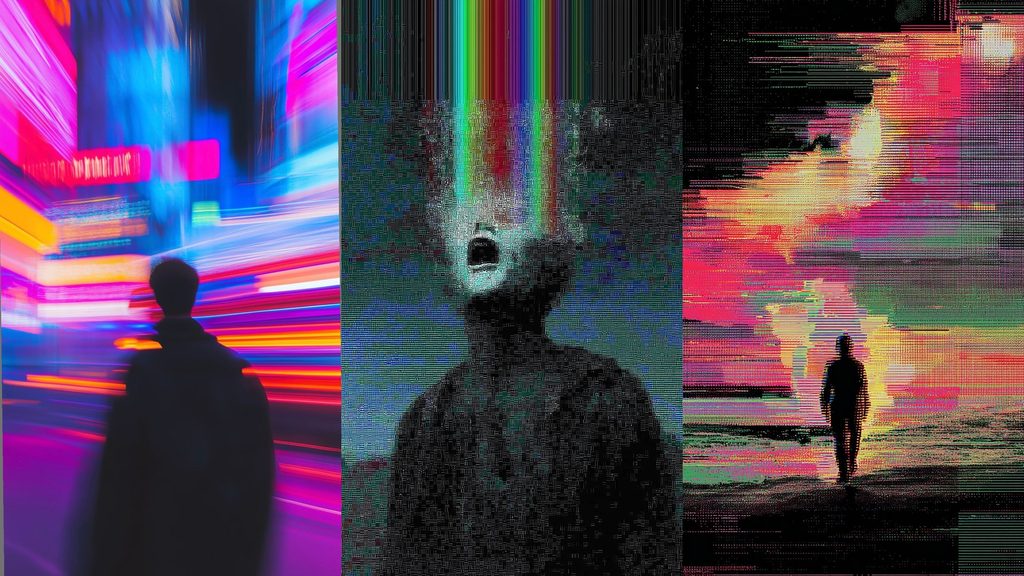
Long streaks of pixels, sorted from dark to light, pour out of the brightest parts of the picture in one direction while the rest of the image stays sharp. It is a classic glitch-art technique.
What usually goes wrong: Models usually draw soft, curved smears or blocky glitch damage instead of true sorted streaks, and they spread the effect evenly over the whole picture. This prompt asks for perfectly straight streaks running in one direction and keeps at least 40 percent of the frame untouched.
Prompt: Rebuild the uploaded image as a pixel-sorted image: a photograph that has been run through a pixel sorting script, so that long runs of its pixels have been rearranged by brightness and now stream across the frame in one direction.
THE CORE CONCEPT, read this first: This is PIXEL SORTING, not blur, not a motion trail and not datamoshing. In selected stretches of each row or column, the original pixels are kept but reordered from darkest to lightest, so each stretch turns into a thin, perfectly straight streak that ramps smoothly through the colors that were already in that line. Every streak starts at a hard edge where the sorting begins and runs in one direction only. It is not a soft smear, not an RGB split, not square blocks and not an evenly applied overlay: it is real content from the image, sorted line by line.
THE STRUCTURE: Choose ONE direction for the whole image. In most cases it is vertical, so the streaks drip downward from the bright areas, but horizontal is allowed if it suits the subject better. Sorting happens only in stretches where the brightness crosses a threshold, for example the brightest 30 to 40 percent of the pixels, so the streaks begin and end abruptly where the brightness changes. Streaks are 1 to 3 pixels wide and between 40 and 400 pixels long, run perfectly straight and parallel, and end on a hard edge without fading out. They are densest in the highlights, the sky and the lightest surfaces, and sparse or absent in the dark areas. Dark shadows stay unsorted.
THE CLEAN PART: At least 40 percent of the frame, ideally more, stays completely unsorted: sharp, correctly colored and correctly exposed, exactly as in the original, with no blur, no grain and no tint. The most important part of the subject, such as a face, an eye or the key detail, stays sharp and unsorted so the picture remains readable.
THE COLOR: Every streak is built only from the colors already present in that row or column, ordered from dark to light. A streak through a blue sky ramps from deep blue to pale blue, and a streak through a red jacket ramps from dark red to pink. No new colors are invented, and there is no global color cast or tint.
WHAT SURVIVES: Keep the original composition, framing, crop, subject, pose and camera angle exactly. The subject remains recognizable, with the sorting running through it and out of it. The result is the same picture, sorted, never an abstract texture.
NEGATIVE CONSTRAINTS: No Gaussian blur, no motion blur and no soft or feathered edges on the streaks. No streaks that curve, fade or run diagonally. No square blocks and no macroblock damage. No RGB channel splitting. No scanlines, no film grain, no noise, no vignette and no glow. No sorting applied evenly across the whole frame. No new objects, no text, no logos and no watermark. Do not change the crop, do not zoom in and do not add a border.
The final result must look like a real photograph that has been processed with a pixel sorting script, with perfectly straight streaks of sorted pixels pouring out of its brightest areas.
If it comes out wrong, run this on the result: Only fix the structure: make every streak a perfectly straight, parallel run of sorted pixels in one direction that starts at a hard threshold edge, remove all blur and glow, and leave the unsorted part of the picture sharp and untouched. Keep the composition, colors and crop identical.
4. Thermal Vision
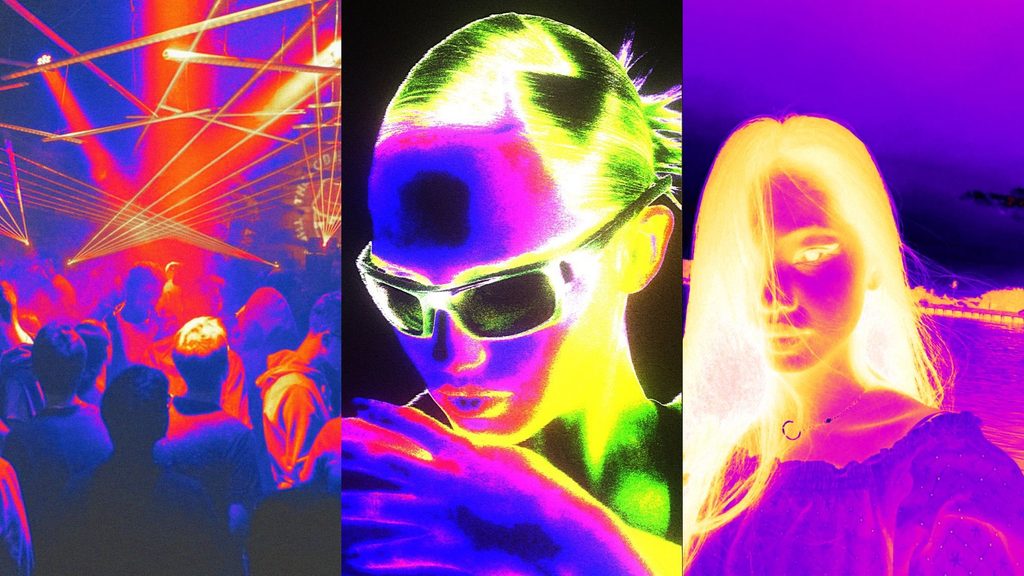
The picture recolored as a heat map, as if seen through a thermal imaging camera. Warm bodies glow yellow and white, and everything at room temperature falls to deep purple and black.
What usually goes wrong: Models tend to paint a plain blue or red tint over the photo instead of recoloring it by temperature, and they keep sharp photographic detail. This prompt makes living bodies the hottest areas, locks the palette to the iron ramp, and softens the detail to a low-resolution sensor look.
Prompt: Rebuild the uploaded image as a frame from a thermal imaging camera: the picture shows heat instead of light, mapped onto a false-color palette.
THE CORE CONCEPT, read this first: A thermal camera cannot see visible color or light. It measures temperature and paints it with a fixed palette, so the original colors of the picture are thrown away completely and replaced by heat. This is not a color filter, not a gradient map laid over a photograph, not a neon glow and not a night vision image. Every area of the picture is recolored according to how warm that thing would be in real life.
THE HEAT LOGIC: Living bodies are the hottest things in the frame. The face, hands, neck and torso of a person or animal glow yellow to white-hot, while clothing, hair and extremities fall to orange and red. Warm objects such as engines, lamps, screens, fire and hot food are white-hot. Everything at ambient temperature, such as walls, ground, vegetation, sky and furniture, sits in the cold end of the palette. Glass and eyeglasses are opaque dark shapes, because thermal cameras cannot see through them. Bodies lose heat into the air around them, so a soft orange halo fades into the cold surroundings. If the picture has no people or animals, the sunlit surfaces and the most prominent object take the warm end of the palette.
THE PALETTE: Use the classic iron palette, in strict order from cold to hot: black, deep indigo, violet, magenta, red, orange, yellow and white. The coldest areas are near-black indigo and violet, mid temperatures are magenta and red, and the hottest areas are yellow with white cores. No colors outside this ramp, and no natural colors survive: no green foliage, no blue sky and no natural skin tone.
THE SENSOR: The image looks like a low-resolution sensor enlarged to fit the frame. Detail is soft, edges are slightly smeared, and faint square pixel steps are visible along sharp temperature boundaries, with each cell 4 to 8 pixels wide. A little sensor noise shimmers in the flat cold areas. Textures such as fabric weave, skin pores and fine print disappear, because a thermal camera only records temperature, so surfaces look smooth.
THE READOUT: A thin vertical color scale bar runs along one edge with two or three tiny numbers beside it, and a small crosshair with a tiny numeric temperature reading sits on the hottest part of the subject. The numbers are small and dim, and they are not meant to be read. Nothing else is overlaid.
WHAT SURVIVES: Keep the original composition, framing, crop, subject, pose and camera angle exactly. The scene must stay recognizable from the heat patterns alone, including any face.
NEGATIVE CONSTRAINTS: No natural colors and no photographic texture. No green night vision look and no single-color blue or cyan tint. No sharp fine detail and no glossy, high-resolution rendering. No rainbow palette with green or light blue bands. No neon glow or bloom beyond a faint softness around the hottest areas. No words, no brand names, no logos, no timecode and no watermark. Do not change the crop.
The final result must look like a real frame captured by a handheld thermal camera, where everything is colored by how hot it is and nothing by how it looks.
If it comes out wrong, run this on the result: Only fix the heat logic and the palette: recolor everything by temperature with the iron palette, from black through indigo, magenta, red and orange to yellow and white, make living bodies the hottest areas, remove every trace of natural color and photographic texture, and soften the detail to a low-resolution sensor look. Keep the composition and the crop identical.
5. Flash Light
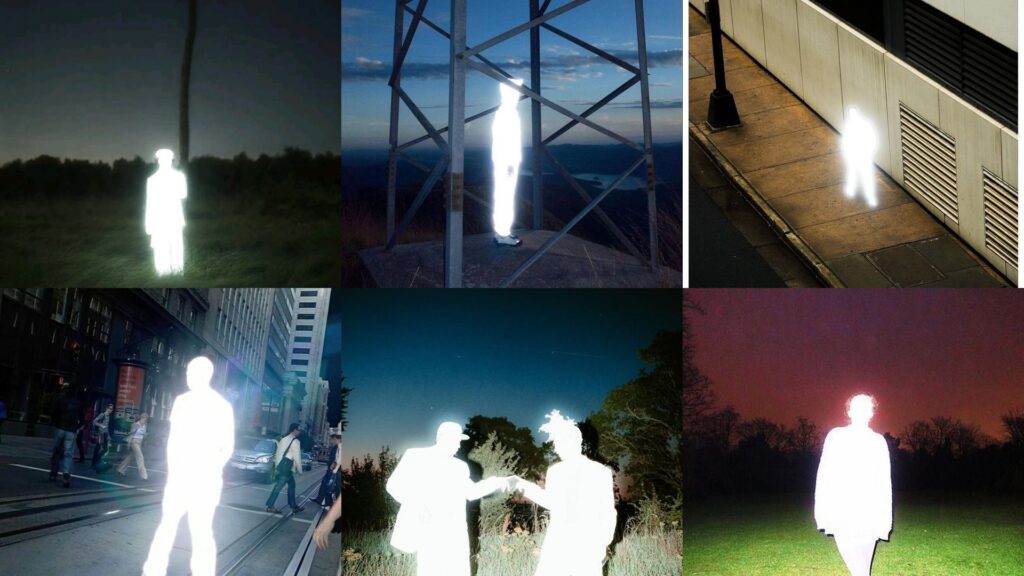
A hard direct flash burns every person into a flat, pure white silhouette with a soft halo, while the scene around them keeps its normal exposure. If your photo has no people, the prompt burns the main subject instead, such as an animal, a statue, or a vehicle.
What usually goes wrong: Models want to keep the face because it is a photo of a person, and they tend to overexpose the whole scene or turn it into night. Only the people should burn out, and the background keeps the original light and time of day.
Prompt: Rebuild the uploaded image as a snapshot taken with a hard, direct, on-camera flash that has completely burned out every person in the frame, turning each one into a solid white silhouette while the scene around them stays correctly exposed.
THE CORE CONCEPT, read this first: The flash bounced off the people and overexposed them so far that they clipped to PURE WHITE. Every human figure in the frame, whether there is one or several, becomes a flat white shape in the exact outline of their body and pose, with absolutely no detail left inside: no face, no eyes, no hair texture, no clothing, no folds, no hands, no shoes, no shading. Everything that is not a person keeps its normal exposure. This is not a ghost, not a hologram, not a glowing neon figure, not a person dressed in white, not a paper cutout, and not a picture where everything is overexposed: only the people are destroyed. If there are no people in the picture, the same happens to the single main subject in the foreground (an animal, a statue, a vehicle, an object), which is burned to white in exactly the same way.
THE SILHOUETTE: Each silhouette is flat and uniform, maximum white, 255 on every channel, edge to edge inside the outline. The outline is the real body outline from the original: same posture, same proportions, same position in the frame, same number of figures. The edge is slightly soft and bleeds outward into a bloom: a halo about 10 to 20 percent of the body width, brightest right at the edge and fading smoothly to nothing. Where the figure touches the ground, the ground around the feet is lifted and washed out by the same light within a radius of about half the body height, then falls back to normal.
THE REST OF THE FRAME: Everything else keeps the lighting, time of day, color and exposure of the original: if it was night, it stays a dark night scene with deep shadows and sensor noise; if it was daylight, it stays a normal daylight scene. The surroundings are never blown out and never darkened to compensate. Buildings, grass, sky, street, water, furniture and any other objects remain detailed and readable. A slight color cast toward green, teal or magenta in the shadows is welcome, the way cheap flash film and small sensors drift, at no more than 10 percent saturation.
THE CAPTURE: The image looks like a phone or compact camera snapshot, with a little handheld softness, mild noise in the darker areas, and a faint chromatic fringe of 1 to 2 pixels of cyan or magenta right on the hard edge between the white silhouette and whatever is behind it. There is no visible light source and no lens flare.
WHAT SURVIVES: Keep the original composition, framing, crop, camera angle, location, background and the exact pose and position of every figure. The scene is the same scene with its people burned out of it, and it stays recognizable as that place.
NEGATIVE CONSTRAINTS: No facial features, no eyes, no mouth, no hair, no clothing detail, no jewelry, no hands, no gray shading and no texture of any kind inside the white silhouette. No partial burn where the face survives and the body is white. No gray or cream silhouette: it is pure white. No blown-out background. No change of the time of day. No studio lighting, no rim light, no lens flare, no visible flash or lamp in frame. No outline stroke and no neon edge. No text, no logos, no watermark. Do not change the crop.
The final result must look like a real snapshot where the flash destroyed the subject and left the rest of the picture perfectly normal.
If it comes out wrong, run this on the result: Only fix the silhouettes: remove every trace of detail inside each person so they become one flat area of pure white with a soft halo around the edge, and keep the background exactly as it is, with its original light and time of day. Keep the composition and the crop identical.
6. CRT
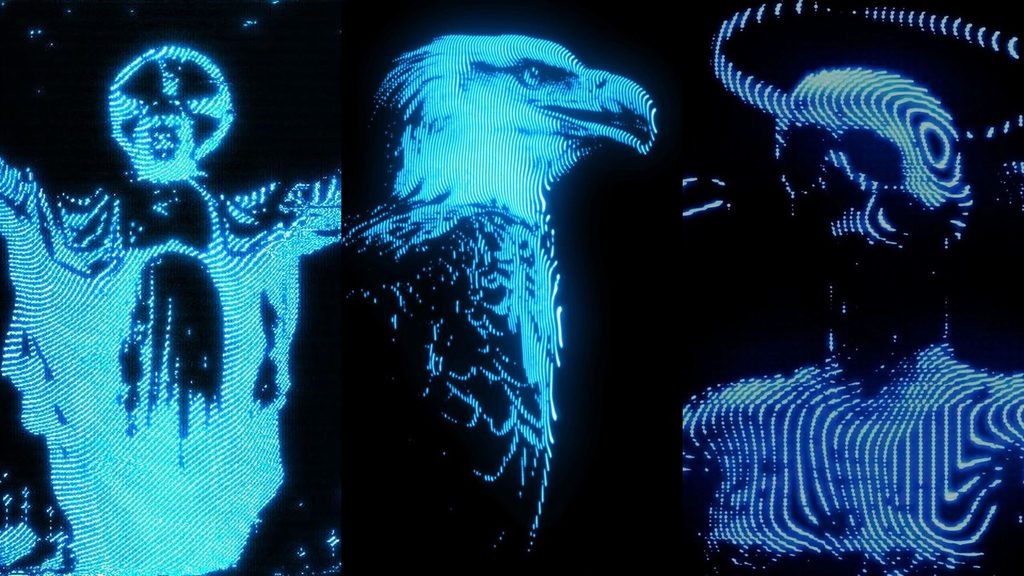
The subject redrawn as thin parallel cyan lines that bend around its form and glow on absolute black, like an old monitor turned up far too bright.
What usually goes wrong: Models return a normal photo with a blue filter and scanlines on top. The prompt insists that no continuous tone survives, only lines, bloom, and black.
Prompt: Rebuild the uploaded image as a picture drawn by an old monitor in a single blinding electric cyan, on absolute black.
THE CORE CONCEPT, read this first: This picture is DRAWN WITH LINES, not photographed and tinted. The subject is rebuilt out of many thin, parallel, glowing cyan lines that run roughly horizontally across the frame and bend as they cross the subject, following its form the way contour lines follow a landscape: they curve around every volume, crowd together and brighten where the surface turns sharply or where the original was light, and thin out, dim or break where the original was dark. Between the lines there is pure black. There is no continuous tone anywhere. This is not a blue duotone photo, not a hologram, not neon tubing, not a wireframe mesh, and not a photo with scanlines laid over it.
THE LINES: The line pitch is between 3 and 6 pixels at native resolution, the line thickness is 1 to 2 pixels, and the spacing is consistent across the frame. Each line is made of a fine chain of dots rather than a perfectly smooth stroke, so up close it reads as a screen. Lines break into short dashes and isolated dots in the darkest areas of the original and disappear completely where the original was black. Fine detail such as eyes, mouths, feathers, hair, leaves or edges is carried by the lines bunching, splitting and bending, never by a separate outline stroke.
THE COLOR: Exactly one hue family: electric blue to cyan. Dim lines are a deep saturated blue, medium lines are a bright cyan, and the brightest, densest lines burn to a white core with a cyan edge. Everything else is absolute black, 0 on every channel. No second hue anywhere: no purple, no green, no warm skin tone, no gray.
THE BLOOM, which is what makes it look like a tube: The brightest lines overdrive: they widen, lose their sharp edge and spill a soft cyan halo of 4 to 12 pixels into the black around them. Where many bright lines meet they fuse into a solid glowing mass with no detail inside. The glow falls off smoothly into black.
THE SCREEN: The image fills the whole frame. There is a faint darker row every few lines, a very slight barrel curve as if the glass were not flat, and a gentle darkening of the corners, plus one or two horizontal tears where a band of lines shifts sideways by a few pixels.
WHAT SURVIVES: Keep the original composition, framing, crop, subject and pose exactly. The subject must be clearly readable from the line pattern alone, including any face.
NEGATIVE CONSTRAINTS: No continuous photographic tone anywhere, no smooth gradients, no blurred or painted areas. No second hue, no color fringing, no RGB channel splitting. No dark gray background: the black is absolute. No monitor housing, bezel, stand, desk or room around the image. No vertical lines: the lines run horizontally and bend with the form. No text, no interface, no menu bar, no timecode, no logos, no watermark. Do not change the crop.
The final result must look like a real photograph redrawn as glowing lines on a cathode-ray monitor turned up far too bright.
If it comes out wrong, run this on the result: Only fix the rendering: replace every remaining area of smooth photographic tone with thin parallel cyan lines that bend around the form, with pure black between them and bloom on the brightest lines. Keep the composition, the single cyan hue and the crop identical.
7. 1-Bit Dither
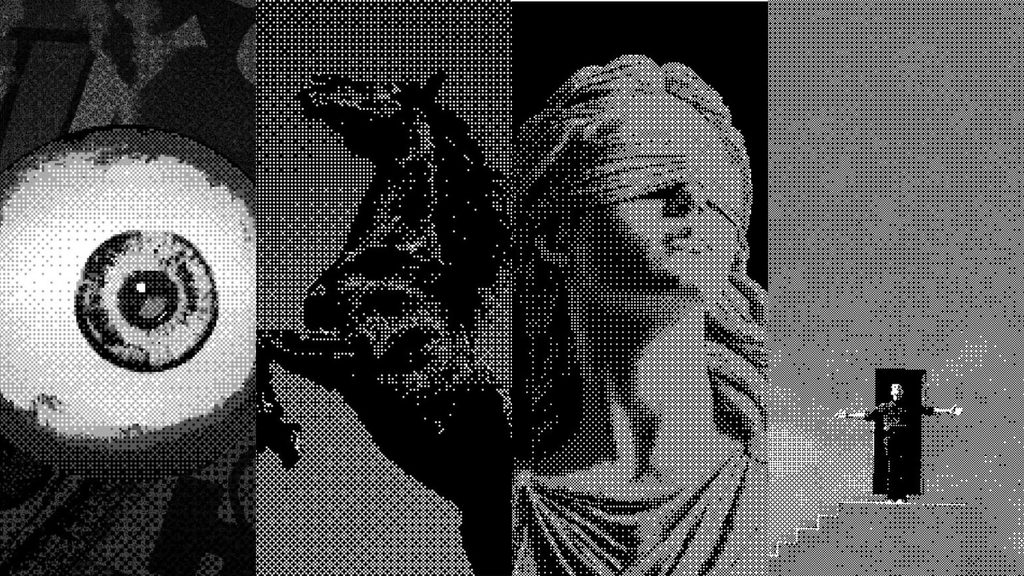
Only black and white pixels, with not a single gray. Every tone is built from a coarse dot pattern in which all the dots are the same size, like a picture on an early computer screen.
What usually goes wrong: Models leave soft grays in the transitions, which breaks the 1-bit rule, and they draw dots of different sizes, which turns it into a halftone, a different effect.
Prompt: Rebuild the uploaded image as a 1-bit image: pure black and pure white pixels only, with every tone resolved by a dither pattern.
THE CORE CONCEPT, read this first: 1-bit means TWO colors. Every pixel is either full black or full white, and there is not a single gray pixel in the whole image. All shading, gradients and soft light are replaced by patterns of black and white pixels sitting next to each other, so that from a distance the eye averages them into tone. Every dot is the SAME SIZE, one cell of the grid, placed on a regular grid. This is not a halftone where dots grow and shrink, not a stipple drawing, not a threshold silhouette with no midtones, not a gray photo with noise on it, and not a newspaper print.
THE DITHER: The dither is an ordered dither at a coarse, visible pitch, with dot cells of 2 to 4 pixels, so the pattern reads as a texture and not as fine noise. In even midtones the pattern settles into a regular checkerboard, crosshatch or diagonal weave; across transitions it steps through visibly different densities in distinct bands rather than a smooth ramp. In the light areas the black dots thin out into sparse isolated pixels on white; in the dark areas the white dots thin out into sparse isolated pixels on black. Large flat areas such as skies, walls or shadows become an even field of the same pattern.
THE TONES: Contrast is pushed hard before dithering: the darkest 25 percent of the original goes to solid black, the lightest 15 percent goes to solid white, and only the middle is dithered. The picture must have real solid black masses and real clean white masses, not an even gray field of dots. Hard edges in the original stay hard: the boundary between a dark shape and a light one is a crisp stepped line of solid black meeting solid white, never a gradual dither ramp.
WHAT SURVIVES: Keep the original composition, framing, crop, subject and pose exactly. The subject must stay clearly readable from the dot pattern alone: faces recognizable, silhouettes crisp, the main shapes reading at a glance.
NEGATIVE CONSTRAINTS: No gray pixels anywhere, not one. No smooth gradients, no anti-aliasing, no soft edges, no blur. No dots of varying size, no halftone rosette, no newspaper screen, no stipple. No color of any kind, not even a tint on the white or on the black. No paper texture, no ink bleed, no scan artifacts. No scanlines, no CRT curvature, no glitch. No frame, no border, no window, no drop shadow, no device mockup. No text, no logos, no watermark. Do not change the crop.
The final result must look like a photograph shown on an early computer screen that can only display black and white pixels.
If it comes out wrong, run this on the result: Only fix the tones: remove every gray pixel and rebuild those areas with black and white dots of exactly the same size on the same grid, pushing the darkest areas to solid black and the lightest to solid white. Keep the composition and the crop identical.
8. Pink Phosphor
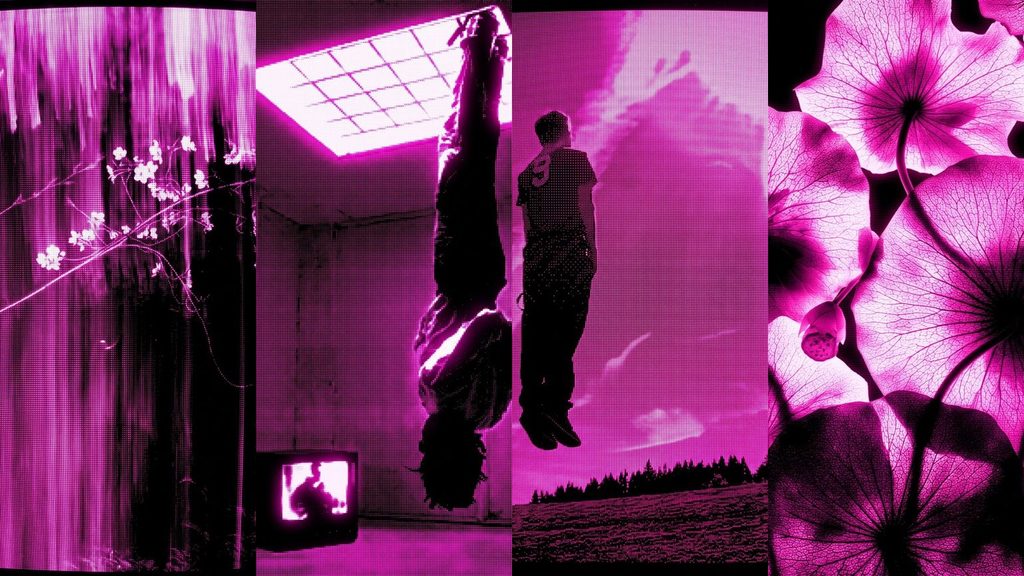
One color only: overdriven magenta on absolute black, with the dot matrix of the screen showing through and the brightest areas blown out to a white-hot glow.
What usually goes wrong: Models leave the background dark gray instead of pure black and smooth the dot matrix into a soft gradient. Both ruin the look.
Prompt: Rebuild the uploaded image as a single-channel phosphor display image: the entire picture drawn in one color on absolute black, with a visible dot matrix and blown-out highlights, filling the whole frame.
THE CORE CONCEPT, read this first: There is exactly one hue in this image, and it is a hot fluorescent magenta pink. Every bright thing in the frame is that magenta at some intensity, from a dim smolder up to a white-hot core, and every dark thing is pure black. All the original color information has been thrown away and replaced by brightness alone, mapped onto this one phosphor. This is not a pink-tinted photo, not a duotone with a second color, not a neon outline, and not a photo with a pink light on it: it is one channel, magenta on black.
THE STRUCTURE: The image is built from a visible regular dot matrix: a fine grid of round emitting cells, 2 to 4 pixels apart, clearly readable in the midtones and merging into solid glow where the signal is strongest. Between the dots the grid gaps stay black, so the whole picture carries a woven screen texture. A faint horizontal scan structure runs across the frame, slightly darker every few rows. Very slight vertical streaking is allowed in the brightest areas, as if the phosphor were smearing.
THE RESPONSE, which is what makes it look overdriven: The gain is pushed far too high. The brightest 15 percent of the image blooms: it blows out into near-white pink cores, spills a soft magenta halo of 6 to 16 pixels into the black around it and loses all internal detail. Midtones stay clearly dotted. Shadows crush completely to pure black with only scattered isolated dots surviving, like stray hits on a sensor. Fine detail in the dark parts reads as sparse specks rather than continuous texture.
THE SCREEN: The image fills the frame edge to edge. A very slight barrel curve of the picture and a gentle darkening of the corners are allowed, but there is no bezel, housing or surrounding room.
WHAT SURVIVES: Keep the original composition, framing, crop, subject and pose exactly. Shapes must still be readable from brightness alone, so the subject and the scene stay recognizable even though everything is one color.
NEGATIVE CONSTRAINTS: No second hue anywhere in the image: no purple, no orange, no red, no cyan fringing, no chromatic aberration. No dark gray background: the black must be absolute. No smooth continuous gradients: the dot matrix must stay visible. No photographic skin tone and no natural color of any kind. No RGB channel splitting, no glitch bands, no interface, no monitor housing. No text, no logos, no watermark. Do not change the composition or the crop.
The final result must look like a real photograph displayed on a single-color phosphor screen with the brightness turned up far past what the tube can handle.
If it comes out wrong, run this on the result: Only fix the palette and the screen: remove every hue except the magenta, crush the background and the shadows to pure black, and make the dot matrix visible again in the midtones. Keep the composition and the crop identical.
9. Halftone Print

A photo printed in a single black ink, using round dots that grow and shrink on a regular grid, like an old newspaper or a screen-printed poster.
What usually goes wrong: Models confuse halftone with 1-bit dither or stipple, so the dots come out all the same size or scattered randomly. The key is that the dot size changes while the grid spacing stays fixed.
Prompt: Rebuild the uploaded image as a one-color halftone print: a photograph reproduced in black ink on paper, using a screen of round dots that change size.
THE CORE CONCEPT, read this first: A halftone print has only one ink and no gray. Every tone is created by the SIZE of round black dots placed on a regular grid: tiny dots in the light areas, large dots that touch and merge in the dark areas, and everything in between. The dot size changes while the grid spacing stays fixed. This is not a 1-bit dither where every dot is the same size, not a random stipple, not a gray photo with a dotted texture on top and not a colored comic book print.
THE SCREEN: The dots sit on a regular grid rotated 45 degrees, with 6 to 10 pixels between dot centers at native resolution, so the dots are clearly visible even when the picture is seen small. In the lightest areas the dots shrink to specks and vanish into clean paper. In the midtones they are round and clearly separate. In the darkest areas they swell, touch and merge into solid black, with only small holes of paper left. Where a dark shape meets a light one, the dots change size quickly but stay on the grid.
THE TONES: Contrast is pushed before the screen is applied, so the picture has real solid black areas, real clean paper-white areas and a clear, graphic middle. The subject must separate from the background through the dot sizes alone.
THE PAPER AND INK: The paper is a warm off-white with a fine visible fiber grain and a very slight yellowing toward the edges. The ink is a single dense black that is a little uneven, with faint speckles where the ink did not take and slightly soft, rounded dot edges, as if printed on a newspaper press. There is no second ink and no colored tint.
WHAT SURVIVES: Keep the original composition, framing, crop, subject, pose and camera angle exactly. The subject stays clearly readable from the dot pattern alone, with faces recognizable and the main shapes reading at a glance. The print fills the whole frame.
NEGATIVE CONSTRAINTS: No gray pixels, no continuous tone and no smooth gradients anywhere. No dots of equal size across the whole image. No random or hand-drawn stipple. No color, no CMYK rosettes and no spot color. No comic book speech bubbles, no pop art outlines and no text. No newspaper layout, no page, no border and no frame around the print. No scanlines, no CRT curvature and no glitch. No logos and no watermark. Do not change the crop.
The final result must look like a real photograph printed with a coarse halftone screen in black ink on off-white paper.
If it comes out wrong, run this on the result: Only fix the tones: replace every area of continuous gray with round black dots on the same 45-degree grid, with tiny dots in the light areas, large merging dots in the dark areas, and clean paper where the picture is lightest. Keep the composition and the crop identical.
10. Night Vision
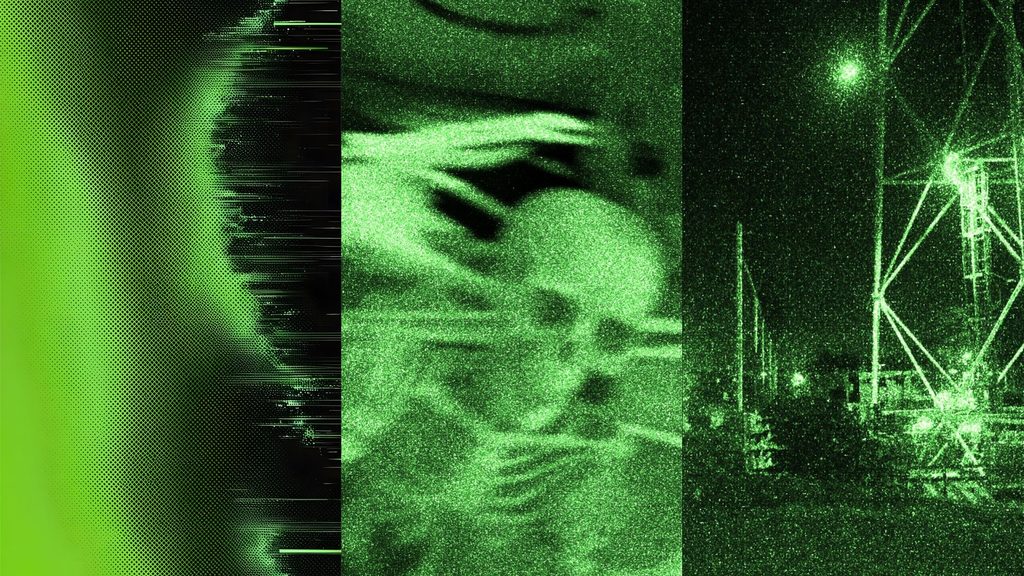
A noisy, glowing green image, as if the scene were seen through night vision goggles in near-total darkness.
What usually goes wrong: Models usually return a dark photo with a green tint and clean detail. This prompt demands heavy speckle noise, lifted shadows, and glowing pale foliage and skin.
Prompt: Rebuild the uploaded image as a frame seen through a night vision device: a scene lit by almost no visible light, amplified into a single glowing green image.
THE CORE CONCEPT, read this first: A night vision device collects the faintest light and infrared, multiplies it thousands of times, and displays the result on a green phosphor screen. The picture therefore has exactly one color, green, and all of the original color information is replaced by brightness alone. This is not a green color filter, not a dark photo with a green tint, not a thermal image and not a video game interface. It is a noisy, over-amplified, slightly soft image that was never meant to look beautiful.
THE LOOK OF THE LIGHT: Brightness decides everything. Pale, reflective and sunlit surfaces glow bright, and foliage, grass and skin turn surprisingly pale, because plants and skin reflect infrared strongly. Dark clothing, deep shadows and open sky sink into murky dark green and near-black. Eyes and glossy surfaces facing the camera flare into small bright discs. Any visible light source blooms into a large white-green glow that washes out the area around it.
THE NOISE: The gain is very high, so the whole picture shimmers with coarse, bright speckles, 1 to 3 pixels each, covering 15 to 25 percent of the darker areas and thinning out in the bright areas. The speckle looks like scintillation and never like a smooth film grain. Shadows are lifted into a murky, noisy visibility instead of crushing to clean black. Detail is slightly soft, as if seen through an image intensifier tube, with edges that bloom a little.
THE COLOR: Exactly one hue family: phosphor green. Shadows are a very dark green, midtones are a saturated mid green, and the brightest highlights are a pale lime that burns almost to white. No second hue anywhere: no teal, no cyan, no yellow-orange, no natural skin tone and no blue sky.
THE SCREEN: The image fills the whole frame edge to edge, with only a gentle darkening in the corners. There is no goggle mask, no circular view and no border.
WHAT SURVIVES: Keep the original composition, framing, crop, subject, pose and camera angle exactly. The scene and the subject remain clearly recognizable from the green brightness values alone, including any face.
NEGATIVE CONSTRAINTS: No natural colors and no second hue. No clean, noise-free, high-resolution image. No smooth film grain. No scanlines, no CRT curvature and no dot matrix. No circular binocular mask, no crosshair, no HUD, no timecode, no REC indicator and no text. No thermal heat colors. No clean black background. No lens flare streaks. No logos and no watermark. Do not change the crop.
The final result must look like a real frame from a night vision camera in near-total darkness, with every surface rendered as a noisy shade of green.
If it comes out wrong, run this on the result: Only fix the rendering: remove every color except phosphor green, lift the shadows into murky, noisy visibility, add coarse bright speckle noise across the darker areas, make pale and reflective surfaces glow brightest, and soften the detail slightly. Keep the composition and the crop identical.
Why These Prompts Work
Each prompt follows the same pattern. It opens with the core concept and says what the style is not, then describes the structure with exact measurements, then lists what must survive from your original photo, and ends with a list of negative constraints that block the most common failure for that style.
That last part matters most. Most of these effects fail in the same predictable way, such as glitch spread over the whole frame, soft grays in a 1-bit image, or a dark gray background where pure black is needed. Naming the failure in the prompt prevents it.
Tips for Better Results
Keep the negative constraints in when you paste a prompt. They do most of the work.
Use the fix prompt instead of rewriting the original. It targets only the structure that went wrong and keeps your composition, colors, and crop identical.
Start with a photo that has one clear subject. Styles such as Flash Light and Thermal Vision work best that way.
If you want to explore more AI tools, check our homepage. Or visit the Blog for more prompts and tutorials like this one.