10 AI Photo Prompts Worth Saving
Most AI photo edits either overdo it, turning skin into plastic or wiping out someone’s identity, or barely change anything at all. Out of thousands of AI photo edits tested, these 10 AI photo prompts consistently produced realistic, usable results instead of the obvious “AI-generated” look.
Read more: Top 20 Design Styles You Can Steal with AI
Each of these AI photo prompts is built to preserve the subject’s identity while fixing one specific problem. Copy the prompt, paste it into your AI image editor of choice along with your photo, and adjust the bracketed sections where noted.
1. Correct Double Chin
Correct Double Chin fixes the classic low-angle phone photo problem: an exaggerated jawline, double chin, and flared nostrils caused entirely by camera angle rather than actual appearance.
It works by simulating a more flattering, eye-level camera position instead of slimming the face or altering bone structure.
Correct Double Chin is specifically written to avoid identity changes, so the subject still looks exactly like themselves, just photographed from a better angle.
Prompt:
Subtly correct the unflattering camera angle in this uploaded photo, keeping the subject’s face, features, identity, and the entire scene completely unaltered. If the photo was taken from a low angle creating an exaggerated chin or jawline, subtly adjust the perspective to simulate a slightly higher and more flattering camera position. Reduce any double chin or excess shadow under the chin created by the unflattering angle, not by removing the anatomy, but by simulating better lighting and a more aesthetic angle. Slightly define and clean up the jawline so it looks more sculpted and natural, the way the subject actually looks in person from a normal eye-level angle. If the nostrils are prominently visible from a low angle, subtly reduce their prominence toward a natural frontal view. Subtly adjust the neck length and posture if the angle compressed them unnaturally. All corrections must be extremely subtle and natural; the subject must still look exactly like themselves, just photographed from a more flattering angle. Do not change any facial features, do not slim the face, and do not alter the bone structure. Only correct the distortion caused by the bad camera angle. The final result should look exactly like the same photo taken from a slightly more flattering eye-level position.
2. Change Expression
Change Expression swaps a subject’s facial expression, like turning a neutral photo into a smiling or laughing one, without touching anything else in the image.
It is the simplest prompt on this list, but it still explicitly locks in the person’s identity and lighting so the swap blends naturally instead of looking pasted on.
Prompt:
Change the facial expression of the person in this photo to [DESIRED EXPRESSION — E.G., SMILING, SURPRISED, LAUGHING, ETC.]. Keep the person’s identity, facial features, and overall lighting intact while making the adjustment look natural and realistic. Ensure the adjustment blends seamlessly with the original image.
3. 4K Enhancer
4K Enhancer upscales a photo to ultra-high resolution while treating the original image as the absolute source of truth.
It is written with strict negative constraints, no warping, no facial drift, no altered anatomy, so the AI can’t quietly reshape the subject’s face while “enhancing” it.
4K Enhancer sharpens fine detail like pores, hair strands, and fabric texture while keeping the original lighting, color, and composition exactly as captured.
Prompt:
Ultra-high-resolution 4K enhancement based strictly on the provided reference image. Absolute fidelity to original facial anatomy, proportions, and identity. Preserve expression, gaze, pose, camera angle, framing, and perspective with zero deviation. Clothing, hair, skin, and background elements must remain unchanged in structure, placement, and design. Recover fine-grain detail with natural realism. Enhance pores, fine lines, hair strands, eyelashes, fabric weave, seams, and material edges without introducing stylization. Maintain original color science, white balance, and tonal relationships exactly as captured. Lighting direction, intensity, contrast, and shadow behavior must match the source image precisely, with only improved clarity and expanded dynamic range. No relighting, no reshaping. Remove any grain. Apply controlled sharpening and high-frequency detail reconstruction. Remove compression artifacts and noise while retaining authentic texture. No smoothing, no plastic skin, no artificial gloss. Facial features must remain consistent across the entire image with coherent anatomy and clean, stable edges. Negative constraints: no warping, no facial drift, no added or missing anatomy, no altered hands, no distortions, no perspective shift, no text or graphics, no hallucinated detail, no stylized rendering. Output must read as a true-to-life, photorealistic upscale that matches the reference exactly, only clearer, sharper, and higher resolution.
4. Remove People in Background
Remove People in Background clears strangers or photobombers out of a shot while leaving the main subject completely untouched.
It reconstructs the empty space naturally, matching the original location’s architecture, lighting, and shadows instead of leaving an obvious blurred or cloned patch behind.
Prompt:
Remove all people in the background of the uploaded image. Preserve the main subject exactly. Do not change the subject’s face, body, clothing, pose, or expression. Reconstruct the background naturally where the people were removed, matching the original location, architecture, lighting, shadows, and depth. Do not crop, blur, or stylize. The result must look as if the photo had originally been taken without people in the background.
5. Skin Retouching
Skin Retouching is built for professional-level skin correction without the fake, over-smoothed look most AI edits produce.
It removes pimples, blackheads, and uneven texture while intelligently preserving natural pores, so skin looks soft and healthy rather than plastic.
Skin Retouching also locks in the subject’s original skin tone and keeps facial details like eyes, eyebrows, and hair fully intact.
Prompt:
Professional skin retouching with premium sharpness, advanced imperfection correction; eliminates pimples, acne, blackheads, temporary spots, and irregular texture of the facial skin. Intelligent smoothing while preserving natural pores; soft and healthy skin with realistic texture, without a “plastic skin” effect. Fully preserve the original skin tone and undertone; avoid excessive brightness or darkening. Keep facial details precise: eyes, eyebrows, eyelashes, beard, and hair intact. High-end beauty editorial finish, balanced lighting, refined contrast, subtle facial definition, realistic skin retouching, studio-quality result, ultra-detailed, natural skin texture, ultra-sharp 3x upscale, HD, photorealistic, clean cinematic finish.
6. Phone to Studio
Phone to Studio transforms an ordinary phone photo into something that looks like premium product photography.
It leans on styling cues like deep blacks, soft shadows, and subtle surface reflections to give everyday photos a high-end commercial look, making it especially useful for product shots or listings that need to look more polished.
Prompt:
Premium product photography, luxury advertising, elegant lighting with soft shadows, rich deep blacks, subtle reflections on surface, high-end commercial aesthetic, sophisticated color palette, refined details, expensive feel, studio lighting with gentle highlights, aspirational quality.
7. Remove Watermarks
Remove Watermarks strips logos and text overlays off an image while keeping everything else exactly as it was.
It includes a strict rule against touching the face, hair, expression, or composition, which keeps this prompt focused on cleanup rather than accidentally re-editing the photo.
Prompt:
Keep the image as is and only remove the logos and text overlays on the image. Keep the image clean and preserve the original content. STRICT RULE: Do not change the face, hair, expression, posture, composition, or background.
8. Correct Poor Lighting
Correct Poor Lighting fixes one of the most common phone-photo problems: harsh flash shadows and color casts.
It neutralizes orange, green, or blue tints for more accurate skin tones, brightens underexposed areas, and corrects harsh shadows around the eyes, nose, and chin, all while keeping the edit invisible and the skin texture intact.
Prompt:
Precise correction of deficient lighting. Preserve the face and the essence of the scene. Correct harsh shadows on eyes/nose/chin caused by mobile phone flash. Neutralize color casts (orange/green/blue) for accurate skin tones. Brighten underexposed areas. Final image: photo with flash light taken at night, realistic and intact skin texture, invisible editing.
9. Photo Restoration
Photo Restoration repairs old, damaged, or black-and-white photos by first identifying the photo’s approximate era and original photographic process, then restoring it in a way that stays true to that period.
It fixes scratches, tears, fading, and noise, adds natural color where it’s missing, and reconstructs lost detail like fabric texture or fine facial lines, all while preserving the photo’s original grain and nostalgic feel rather than making it look artificially modern.
Prompt:
Restore this photo with period-accurate techniques, addressing any age-related issues it may have, such as blurring, damage, fading, scratches, tears, folds, worn-out areas, or being in black and white. First, analyze the image to identify the approximate era and original photographic process to ensure a historically accurate restoration. Make it look fresh and clear by gently sharpening soft edges and facial features without overdoing it, smoothing out grainy spots or noise if present, and reconstructing missing parts with realistic textures that match the original. If colors are faded or absent, bring them back naturally and vibrantly but true to the era’s photographic technology without looking artificial; balance colors to match natural lighting, adjust brightness and contrast so everything pops nicely, and maintain original tonality. Add subtle details to faces, objects, or backgrounds that might have been lost, like fine lines in clothing, lifelike skin textures, or small elements in the scenery, while keeping the overall feel authentic, preserving natural grain patterns, and not changing the composition. Ensure the whole image is balanced, with no harsh shadows or washed-out areas, remove technical defects while respecting the nostalgic charm and exposure qualities of the time. Finally, upscale it to a higher resolution like Full HD 32k for better clarity, outputting in a photo-realistic style that looks like a professionally restored or recent high-quality photo.
10. Golden Hour Portrait
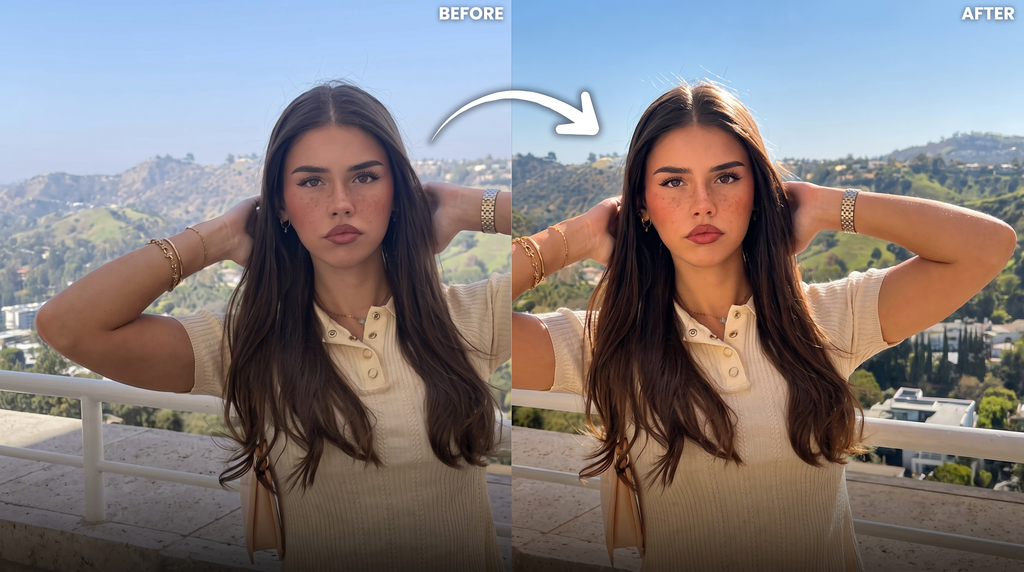
Golden Hour Portrait recreates warm, front-side sunlight and that glowing hair-strand backlight effect without altering anything about the subject except lighting and color atmosphere.
It strengthens facial definition through detail enhancement rather than reshaping features, so the result reads as a better-lit version of the same photo, not a different photo.
Prompt:
Front-side sunlight, fully preserving every original detail of the photo without changes, except for the lighting and the color atmosphere. Enhance loose strands of hair against the backlight. Strengthen facial definition with a high-detail scale enhancement without altering the features. Strict rule: Do not change the face, hair, or background structure of the subject. Do not change the composition.
Tips for Better Results
Upload a high-resolution source photo whenever possible, since AI photo prompts can only reconstruct detail that’s roughly present in the original image.
Replace any bracketed placeholders, like the expression option in Change Expression, before running the prompt.
If your AI photo editor supports negative prompts or strict-mode settings, pair them with these AI photo prompts for even more consistent, identity-preserving results.
Bottom Line
The difference between an AI edit that looks real and one that looks obviously fake usually comes down to the prompt, not the tool. These AI photo prompts were built around one core idea: fix exactly one problem, and leave everything else about the photo alone.
Also read: How to Change Camera Angles On Your Videos With AI
Save these AI photo prompts so you have them ready the next time you need a realistic edit instead of an AI-looking one.
If you want to discover more AI tools, visit our homepage. You can also explore the Blog for more tutorials, curated tools, and useful resources like these.